5 Essential Hand Positions Every Piano Beginner Must Know
2026-02-17
Jake Adams
Proper hand position is the single most important foundation skill for any aspiring pianist. Get it right from the start, and you'll progress faster, play more comfortably, and avoid the frustrating habit corrections that plague self-taught players down the road.
Many beginners focus entirely on hitting the right notes while neglecting how they're hitting them. This oversight can lead to tension, fatigue, and even repetitive strain injuries over time. The good news? Learning correct hand positions early is straightforward, and the benefits compound with every practice session.
In this guide, we'll break down the five essential hand positions every beginner needs to master. Whether you're just starting your piano journey or looking to correct bad habits, these fundamentals will transform your playing.
1. The Relaxed Curved Position - Your Default Hand Shape
Why This Position Matters:
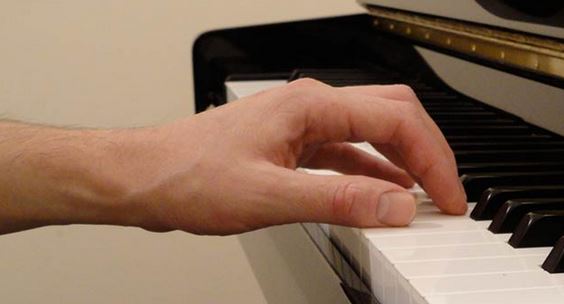
The relaxed curved position is your home base—the natural shape your hands should return to between phrases and during rest. Think of how your hand looks when it hangs loosely at your side. That gentle curve is exactly what you want over the keys.
Tension is the enemy of good piano playing. A relaxed curved position allows for fluid movement, better control, and sustained playing without fatigue.
How to Achieve It:
- Let your arms hang naturally at your sides
- Notice the gentle curve of your fingers
- Raise your hands to the keyboard while maintaining that curve
- Fingers should arc gently, as if holding a small ball
- Wrists should be level with the forearm, not bent up or down
Common Mistakes to Avoid:
Flat fingers that press with the pads instead of fingertips. Collapsed knuckles that create a caved-in hand shape. Raised or dropped wrists that create unnecessary tension.
Best For:
All playing situations, particularly scales, arpeggios, and melodic passages.
2. The C Position - Where Every Beginner Starts

The Foundation of Piano Learning:
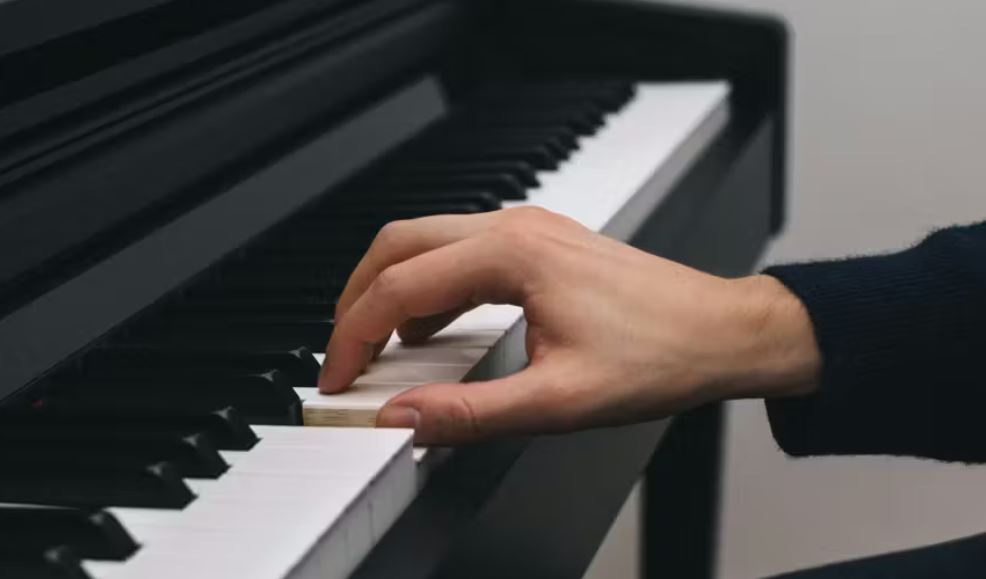
The C position places your right hand thumb on Middle C, with each subsequent finger resting on the next white key (D, E, F, G). Your left hand mirrors this an octave lower, with the pinky on C and thumb on G.
This position introduces you to the keyboard geography and allows you to play countless beginner songs without moving your hands.
Key Features:
- Right hand: Thumb (1) on Middle C through Pinky (5) on G
- Left hand: Pinky (5) on C below Middle C through Thumb (1) on G
- All five fingers engaged and assigned to specific keys
- Perfect for learning finger independence
- Gateway to understanding scales and key signatures
Practice Tips:
Play each finger individually while keeping others resting on their keys. Practice simple five-note melodies without looking at your hands. Focus on even tone production across all fingers.
Best For:
Absolute beginners, first songs, developing finger independence and basic coordination.
3. The G Position - Expanding Your Range
Building on Your Foundation:
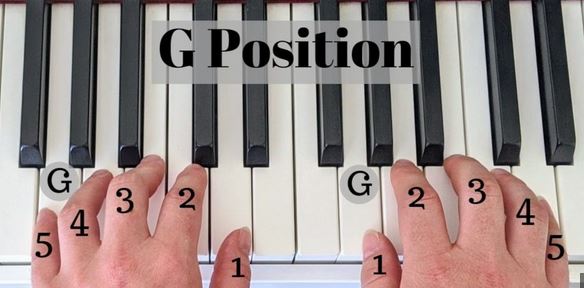
Once comfortable with C position, G position is the natural next step. Your right hand thumb moves to G (above Middle C), covering G, A, B, C, D. The left hand shifts accordingly.
This position introduces you to a new key center and the concept of hand position shifts—essential for playing real music.
What Makes G Position Important:
- Introduces the sharp key (F#) in many G position pieces
- Teaches smooth position shifts from C to G
- Expands your comfortable range on the keyboard
- Foundation for understanding the G major scale
- Opens up a new library of beginner songs
Transition Exercise:
Practice moving smoothly between C and G positions. Start slowly, ensuring each finger lands precisely on its assigned key. Gradually increase speed while maintaining accuracy.
Technical Considerations:
Keep your arm and wrist relaxed during the shift. Move your entire arm as a unit rather than reaching with fingers.
Best For:
Early intermediate players, learning position shifts, expanding repertoire options.
4. The Octave Stretch - Power and Expression
When You Need More Range:
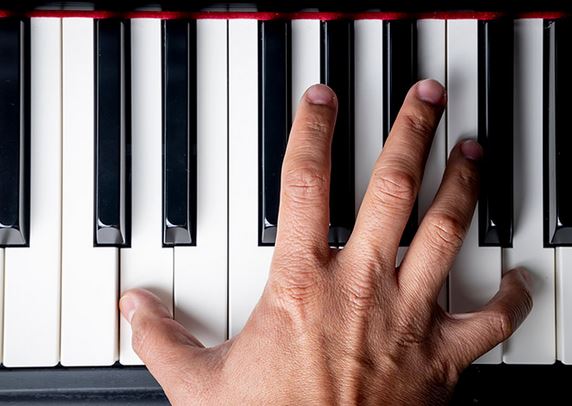
The octave stretch allows you to span eight white keys (or the equivalent distance including black keys) between your thumb and pinky. This position is essential for playing chords, bass lines, and expressive melodic passages.
Not everyone can comfortably reach an octave immediately—hand size varies, and flexibility develops over time.
Developing Your Stretch:
- Start with smaller intervals (sixths, sevenths) and gradually expand
- Keep the hand relaxed—never force a painful stretch
- Practice gentle stretching exercises away from the piano
- Use rotation and arm movement to assist the reach
- Accept that some voicings may need to be rolled or adapted
Proper Technique:
The stretch should come from opening the hand, not tensing it. Your thumb and pinky do the reaching while middle fingers stay naturally curved and relaxed.
Musical Applications:
Alberti bass patterns, left-hand accompaniment figures, dramatic chord voicings, and octave melodies for emphasis.
Best For:
Intermediate players, accompaniment patterns, adding power and depth to your playing.
5. The Chord Position - Harmony at Your Fingertips
Playing Multiple Notes Together:
Chord position involves shaping your hand to play three or more notes simultaneously. Unlike linear positions, chord playing requires thinking vertically—stacking notes to create harmony.
The most common beginner chord shape uses fingers 1, 3, and 5 (thumb, middle finger, pinky) to play root position triads.
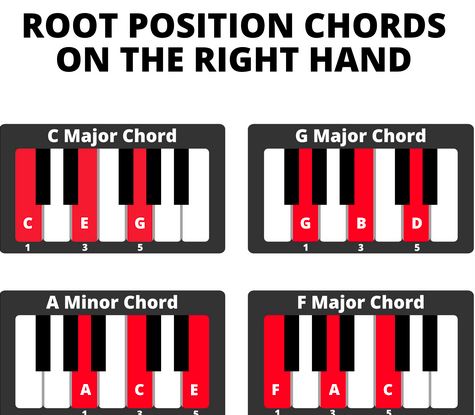
Essential Chord Shapes:
- Major triads: Bright, happy sound (C-E-G for C major)
- Minor triads: Darker, contemplative sound (C-Eb-G for C minor)
- Seventh chords: Add finger 2 or 4 for richer harmony
- Inversions: Same notes, different hand shapes and sounds
- Open voicings: Spreading notes across a wider range
Technique Focus:
All fingers should strike their keys at exactly the same moment. Press down as a unit, not in sequence. Balance the volume so no single note dominates unless intended.
Practice Method:
Play broken chords (arpeggios) first, then block chords. This builds familiarity with the shape before demanding simultaneous coordination.
Best For:
Accompanying singers, playing pop and jazz music, hymns and worship music, songwriting.
Common Questions About Hand Position
How do I know if my position is correct?
You should be able to play for extended periods without pain, tension, or fatigue. Your sound should be even and controlled. If something hurts, something is wrong.
What if my hands are small?
Adapt and be patient. Many successful pianists have smaller hands. Focus on efficiency of movement and consider repertoire that suits your physical capabilities.
Should I use the same position for all music styles?
Positions adapt to musical context. Classical technique emphasizes curved fingers, while some jazz and pop playing uses flatter fingers for specific effects. Master the fundamentals first, then explore variations.
Final Thoughts: Position Is Just the Beginning
Proper hand position isn't about rigid rules—it's about efficiency, comfort, and musical expression. These five positions give you the toolkit to approach any piece of music with confidence.
Remember that positions are fluid, not fixed. As you advance, you'll learn to transition seamlessly between them, adapting your hand shape to the musical demands of each passage.
Start with awareness. Check your position regularly during practice. Over time, good habits become automatic, freeing your mind to focus on the music itself.